anyway, i started the big spring cleaning. mopping all floors, cleaning windows, rearranging here and there... lots of fun stuff.
logan and i have our daily routine down pat so i can rely on his nap times to get things done and also work on some more creative projects. if there's one thing i have learned about myself over the last year or so, it is that i need to do these projects for myself. it helps me stay sane and be a better mom and wife at the same time. i love being a mom, rolling around the floor all day, building towers out of blocks that get knocked down within seconds, tickling that chubby little belly and currently even wiping a very runny nose. hey, i even enjoy doing the housework (except folding the laundry - hate it!). having some time to myself though, to get my own little projects done and out of my massively overloaded brain, makes me enjoy those moments even more.
so i'm gonna stop rambling on about my emotional inner workings now and leave you with one of those little projects i whipped up during nap time. it's a super easy upcycled pallet wood and ball jar planter you can add to your home decor or make useful in a bathroom or kitchen.
here is what you'll need:
pieces of old pallet wood or other weathered looking wood scraps. of course you can also always buy new wood and stain or distress it to your liking
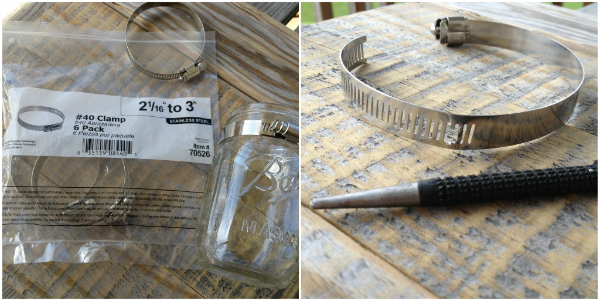
pipe clamps (find these at your hardware store usually close to the plumbing section)
screws/nails
screw gun/drill
hammer
hole punch
ball jars
plants
first you want to cut your wood pieces to the desired length. i used two pieces in the back to nail the slats to. i originally wanted to screw them to those two pieces but ended up just using nails. i messed around with screws that weren't quite long enough for way too long...
you may also want to attach a couple of extra screws somewhere, if you're planing to hang this on a wall.
 |
| you can see the holes from my failed attempt to screw this together |
 |
| what your front side will look like |
now comes the fun part: to make holes in the claps for your screws. i'm gonna be honest, it took me a while to figure this out. i used a hole punch but the metal just wouldn't budge so i eventually decided to just try and widen one of the already existing holes and move the clamps' locks to the side instead of the front of the jars.
to widen the holes i used the same hole punch and just snipped of the extra metal.
now all you need to do is screw the clamps to the board. i opened them up completely to get enough room with the screw gun. you may also want to pre drill the holes to make it much easier
then just place the ball jars in the clamps and tighten them as tight as you can so that they don't move. i filled mine with some succulents and phlox and plan to hang it on the wall somewhere.
you can also use this as bathroom storage for cotton balls, make-up sponges etc...
or plant some herbs and keep it in the kitchen.
now that i've figured out the best way to make the holes in the clamps i think i could make another one in under half an hour. this is really a super simple project and it looks so great.


0 comments:
Post a Comment